
Table of Contents
-
1. A Step by Step guide to building a control parameter
- 1.1. The problem
- 1.2. Control or Virtual Parameter
- 1.3. Control Parameter Checklist
- 1.4. Figure out the lumberjack
- 1.5. Make or find a Target
- 1.6. Determine Run Mode Settings
- 1.7. Assemble Inputs
- 1.8. The Script – Approximation Methods
- 1.9. The Script – Writing it
- 1.10. Finishing up
- 1.11. Potential problems and final thoughts
1 A Step by Step guide to building a control parameter
The goal of this walkthrough is to introduce a few concepts and also tie together information on how to build a control parameter.
1.1 The problem
A customer has several flares that they are trying to gauge gas usage on. However, when the wells were first put in no meter was added for the flares. This means they would have to spend thousands of dollars to get this data directly. Instead they have asked us to produce virtual calculations for each meter.
The calculation looks like.
FlareGas = (𝐺𝑎𝑠𝑆𝑜𝑢𝑟𝑐𝑒𝑠 − 𝐺𝑎𝑠𝐶𝑜𝑛𝑠𝑢𝑚𝑒𝑟𝑠) + 𝐵𝑢𝑦𝑏𝑎𝑐𝑘𝑀𝑒𝑡𝑒𝑟𝑠
1.2 Control or Virtual Parameter
Selecting whether or not to use a control parameter or virtual parameter can be difficult.
I have made a flowchart to go over when you HAVE to use one over the other.
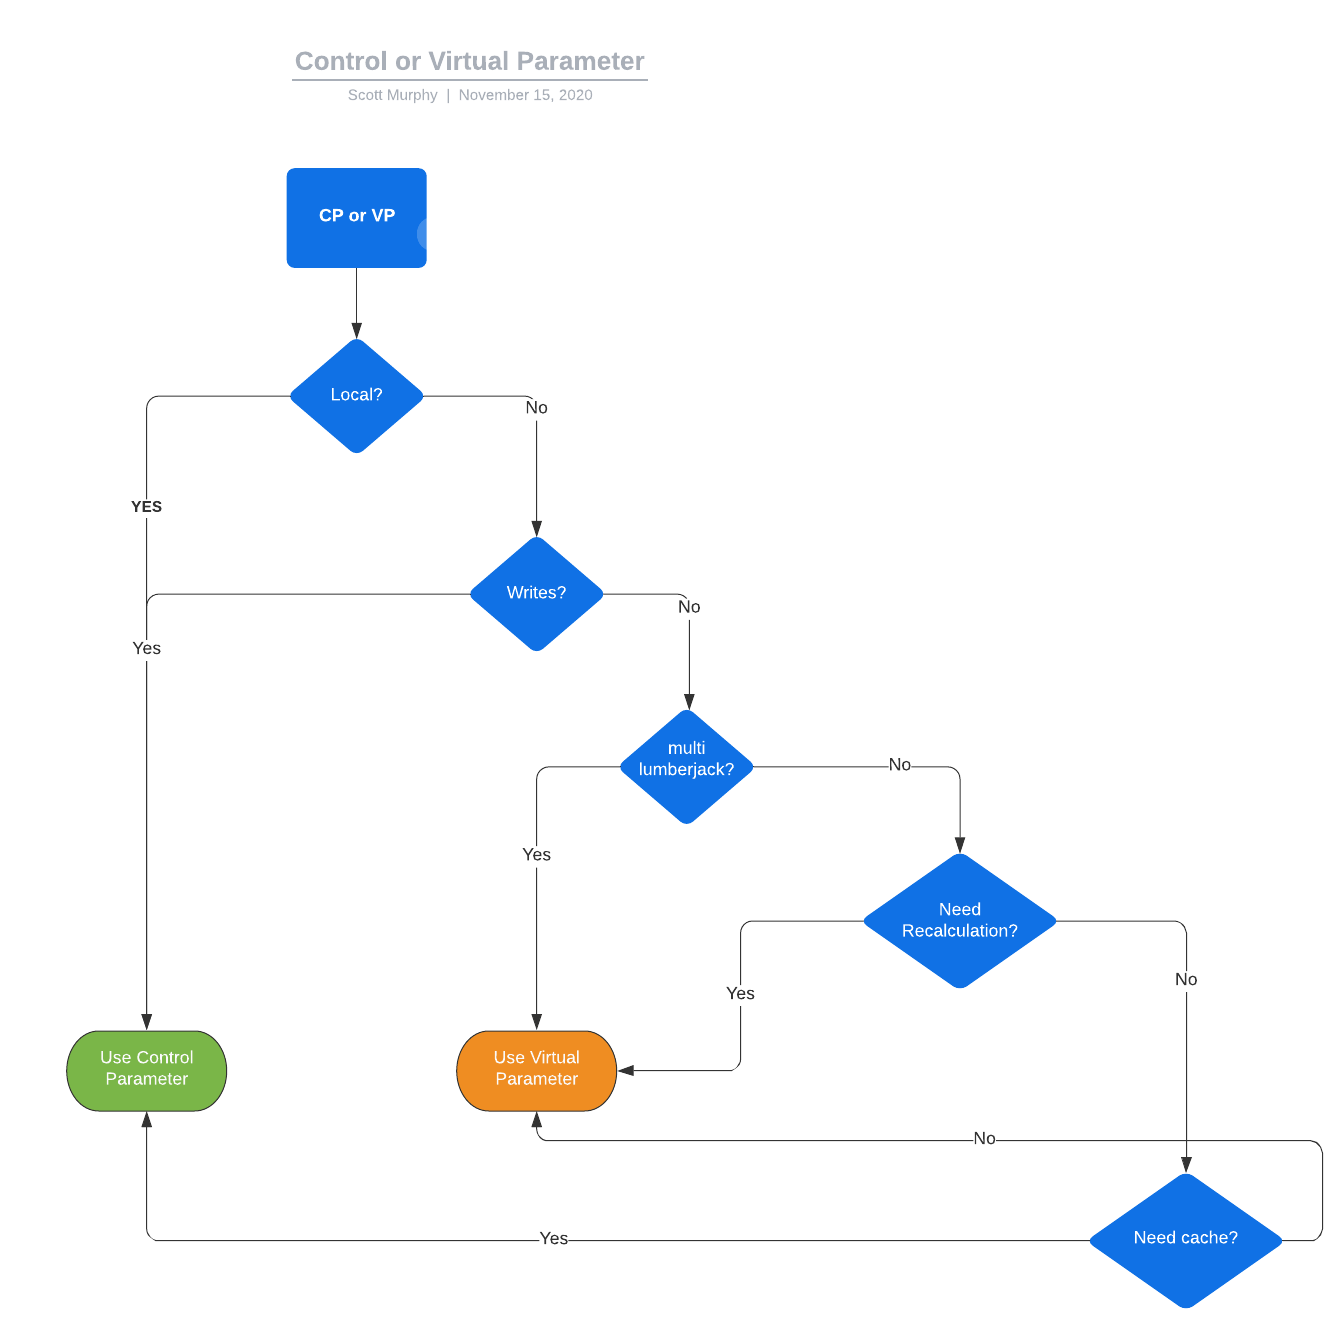
There are other reasons to prefer one or the other but that should be a good starting point.
For our problem we are going to pick control parameters. We are doing this because we want caching and do not want recalculation.
What is recalculation? Recalculation is a property that virtual parameters have, every time you look at the result of a virtual parameter it recalculates its outputs. This means you can look at it two times and get two results. Why don’t we want this? Because the number of devices at a flare meter can change over time, we want the cached/persisted value (see the flow chart) to be what is used.
1.3 Control Parameter Checklist
1.3.1 TODO Figure out Lumberjack
1.3.2 TODO Select or Create Target PID
1.3.3 TODO Determine Run Mode Settings
1.3.4 TODO Assemble Inputs
1.4 Figure out the lumberjack
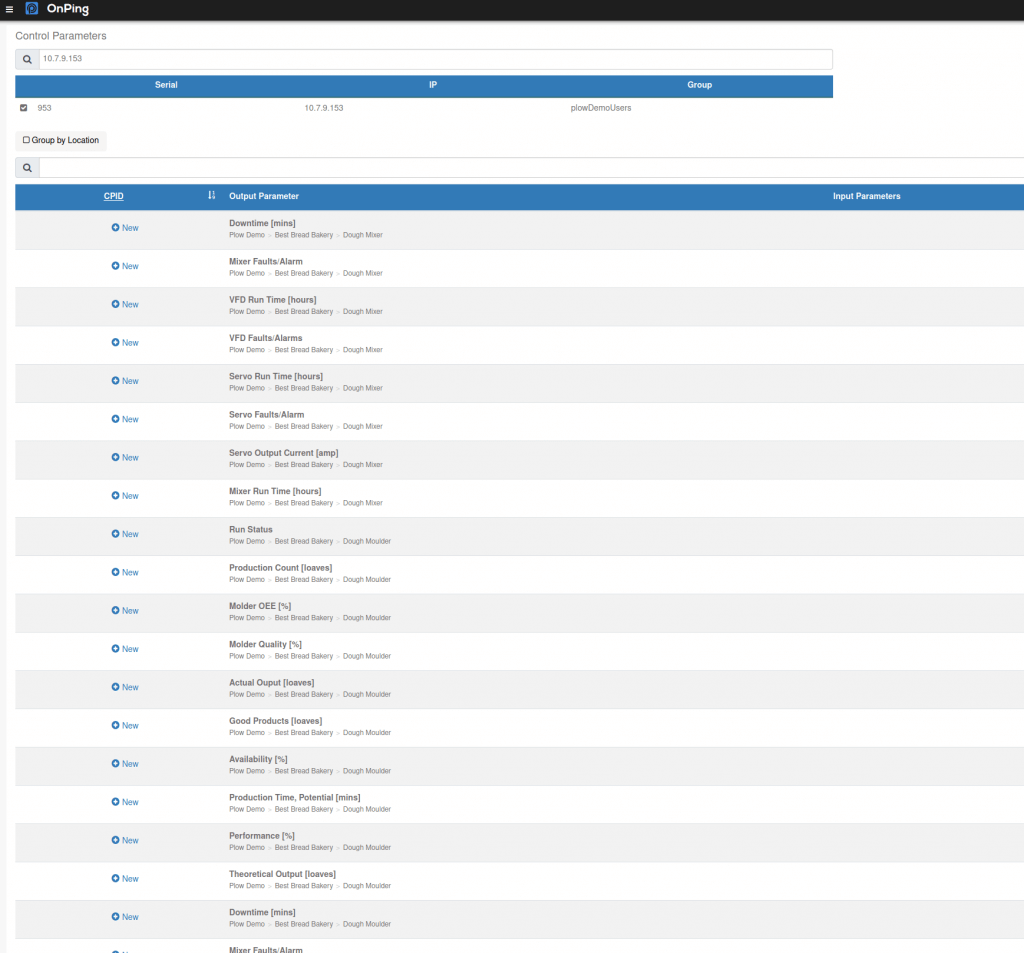
The best way I know to find the lumberjack is to search for the location.
For instance, search for Best Bread Bakery is:location in onping.
That gives us an IP: 10.7.9.153 now you can go to the control parameter screen and plug that IP in.
1.5 Make or find a Target
If we don’t have a target for the parameter created already we use “Calculated Parameters” as the name of a single well manual target.
Single well manuals are a great way to create targets for control parameters.
Remember a CPID is not like a PID or a VPID, they can’t be directly graphed or displayed.
They are completely defined by their output PID.
We will make an output pid named “Virtual Flare Flowrate” and use it as a flowrate.
1.6 Determine Run Mode Settings
We will want this parameter to run on change. So we tie it to an “On Change” event, this allows it to run whenever its inputs update. We could also schedule an update, but this doesn’t make sense for a flowrate.

1.7 Assemble Inputs
These flare meters are different for every site that runs them. This one has a Separator and Sales Meter.
The Separator is a Gas Producer and the Sales is a Gas Consumer. There is no Buyback or other meters.
So to calculate the Flare Gas Flow Rate: FlareGasRate = SeparatorGasRate - SalesGasRate is the formula.
Not too bad.
We will select each of the inputs individually. Note: they have to be on the same lumberjack or we need to use lumberjack remote to relay one to the other or use virtual parameters instead of control parameters.
1.8 The Script – Approximation Methods
The script could be written several ways. The control parameter interface will help us think about what we want to happen.
So the first question is, what approximation method should we use to gather inputs.
An approximation method determines what value to grab when there is no value to pick.
This is very important in networked data like ours. Lets spend a bit of time looking at the methods of approximation readily available in OnPing.
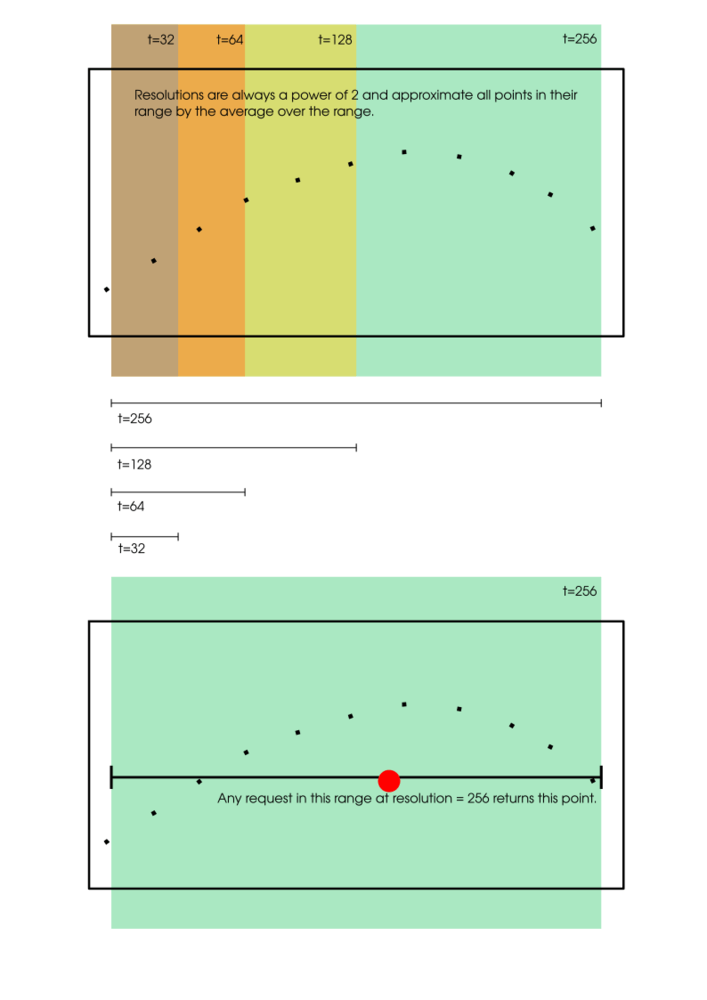
1.8.1 The input function and resolution approximation.
Tachdb has a multi level approximation technique that allows the value at a time to be represented by course or fine averages. This allows for very fast trends and well synchronized data.
Here is an example of the way an approximation level selects an average.
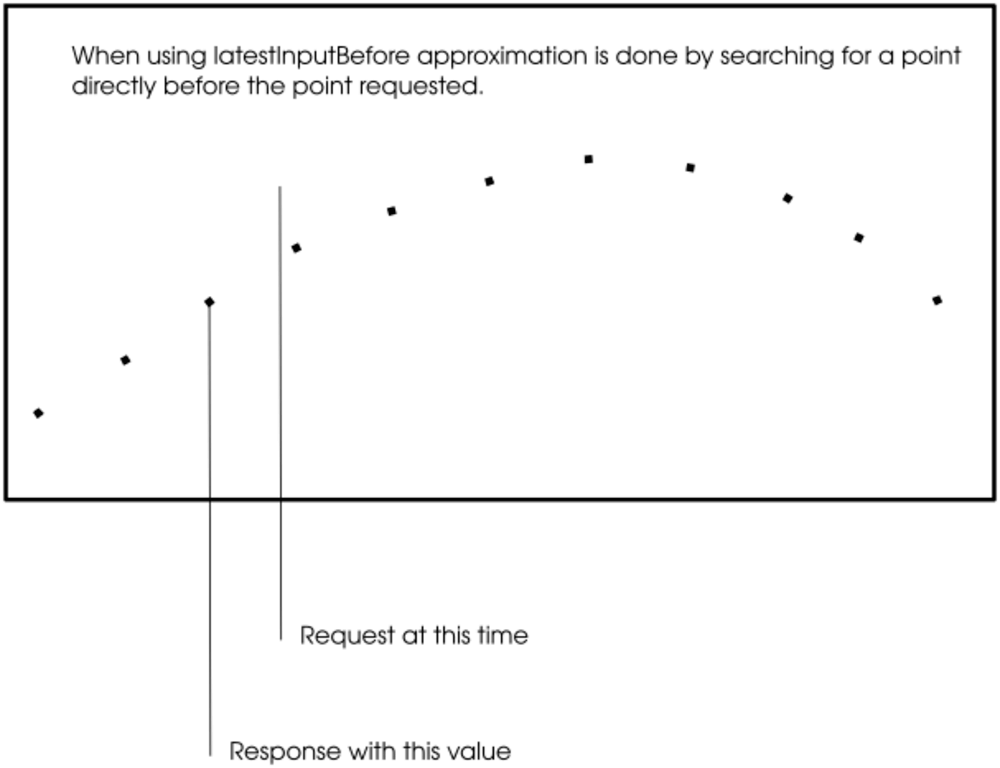
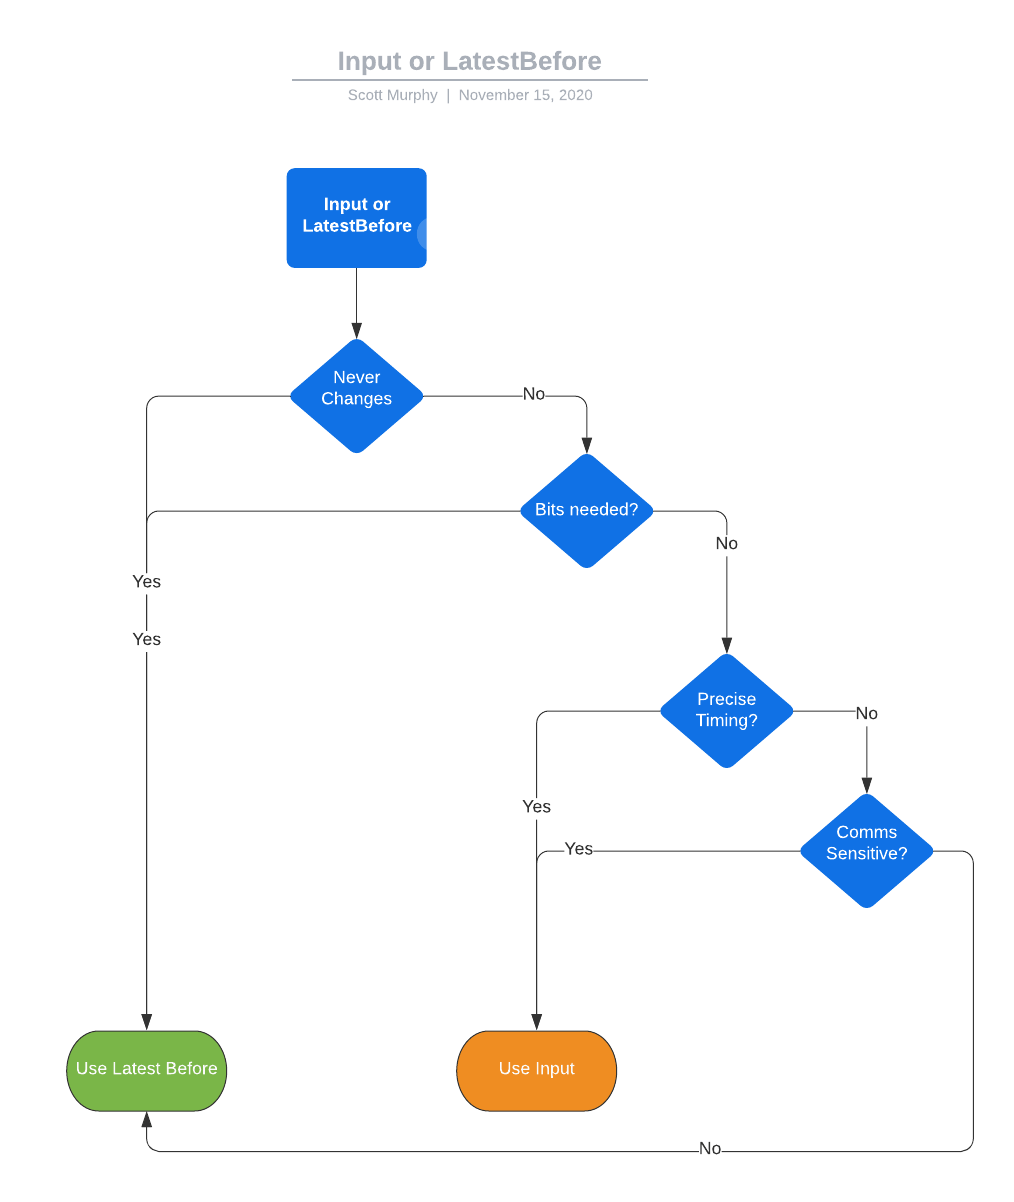
1.8.2 The latestBefore function and value search
The other way tachdb allows a user to approximate a value is by searching for a value closest in the past to the given point.
1.8.3 Which to pick?
We are going to use the input function and select a resolution of 256s. This will make sure that we don’t grab 1 point that is happening now and another that is happening days ago. There are really good reasons to use each in various situations so just because we pick this now doesn’t mean it is always what should be used.
Another flow chart!
1.9 The Script – Writing it
I like to start with the thing done and then break down. Here is the final product.
/*
Virtual Flare is the missing gas from the rest of the meters
*/


separator := input(1,now);
salesMeter := input(2,now);


if( isUnit(separator) ||
    isUnit(salesMeter) ) then

   output := ();
else

rslt := separator - salesMeter;

if (rslt < 0.0 ) then
   output := 0.0;
   else
    output := rslt;
end_if;

end_if;
That is it! This small script responds to events coming in from onping and resolves them correctly.
Lets break down each part.
1.9.1 What is the isUnit ?
As mentioned before input uses an averaging window to determine a value. But what happens if there is no value in that window? We get a value called Unit. This simply means that no value could be returned. It is similar to the Null value you may be more used to seeing but unlike that value, control parameters are smart enough to realize when you haven’t properly accounted for a Unit value. In other words if you try to add one input to another without first describing what happens if one value isn’t present you get an error.
if( isUnit(separator) ||
    isUnit(salesMeter) ) then

   output := ();
else
Unit is written (). So this says, if no value is present on one of the parameters then don’t write any value. This is often (but not always) the correct behavior.
1.9.2 Zero Bounding the result
After performing the calculation…
rslt := separator - salesMeter;
Negative flow rates come up often because values don’t line up quite right. This is also helped by the averaging.
But we still want to zero bound the output.
if (rslt < 0.0 ) then
   output := 0.0;
   else
    output := rslt;
end_if;
output is always the name of the result of the script. The last reached output statement is what is used in the output of
the script.
1.10 Finishing up
We could have added a truncate code to the control parameter like …
output := rslt `2;
But because unlike virtual parameters, control parameters can be masked! I usually leave this stuff to be done with a mask that way it can be changed like everything else.
1.11 Potential problems and final thoughts
Writing programs is understanding the difference between what you expect to happen and what could happen. Then trying to defend against what could happen in a way that it doesn’t break everything you are trying to do.
You will read a program many more times than you write it so try and think about what makes this easier.
That usually means well named variables and descriptive comments. But often means much more than that.
I hope this post starts to show you all that can be done with control parameters.
Thank you!