Bringing a Siemens S7 PLC in to OnPing as a Modbus Server
This guide assumes you already have TIA Portal and software support packages installed. If you have an existing project associated with the PLC you would like to configure, open it and skip to the Creating the Modbus Server section of this document.
Beginning a New Project
This guide will use TIA Portal v15.1 and a Siemens S7-1200 PLC to serve as an example.
Open TIA Portal and create a new project, after which you should be directed to the First Steps screen.

Click on Configure a device and then Add new device. From the Controllers menu, navigate the file browser and find your specific PLC by its name and MLFB (Article no.) as shown below.
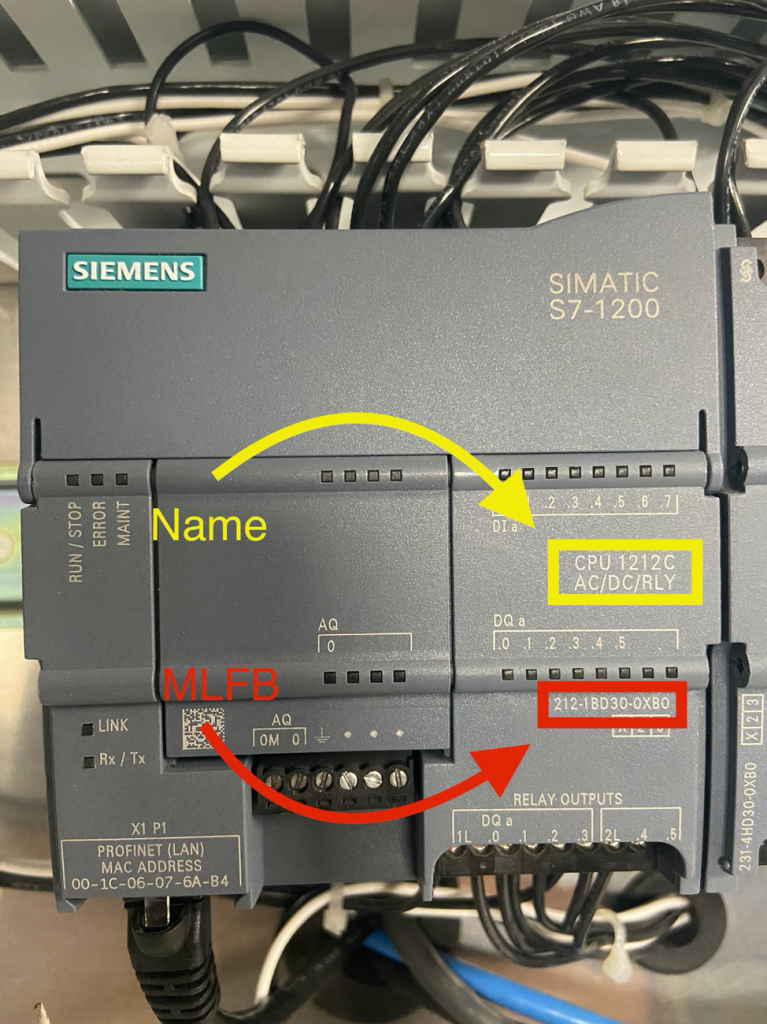
In this case, we’ll select Controllers > SIMATIC S7-1200 > CPU > CPU 1212C AC/DC/Rly > 6ES7 212-1BD30-0XB0 and then click Add.

This should pull up the Device view of your PLC, where you can add any additional signal boards and modules by right clicking their location in the device view, selecting Show catalog, and choosing the device that corresponds to your physical setup.

Once you have finished setting up your device, we can create the Modbus Server.
Creating the Modbus Server
In the Project tree on the left hand side, expand your PLC drop down menu, enter Program blocks, and double click your Main block. On the right hand side should be the Instructions panel (if you do not see this, you can expand it by clicking Instructions on the right hand side near the top). At the bottom of the Instructions panel under Communications, expand the Others and Modbus TCP folders and drag MB_SERVER to the desired Network in your Main program block.

This should open a menu for the required Data block. Name it whatever you like and click OK.

You should now see an MB_Server block with the following inputs and outputs:
Inputs:
EN – The input to the server
DISCONNECT – If this input is set to true, it will refuse any attempted connection
CONNECT_ID – The server’s ID, must be different from any other servers on the network
IP_PORT – The IP port of the server, default of 502
MB_HOLD_REG – The Data block representing the Holding Registers of the server
Outputs:
ENO – The output of the server
NDR – New Data Ready: Indicates if data was written by the client
DR – Data Read: Indicates if data was read by the client
ERROR – Indicates if an error occurred. If true, error code is displayed in STATUS
STATUS – Status information for the instruction / displays error codes

We will create a Data block to represent these inputs and outputs.
Modbus Config Data Block
In the Project tree under Program blocks, double click Add new block. Choose a Data block, name it something along the lines of Modbus_Config, ensure it is a Global DB and click OK.

We want to add a field for all inputs and outputs except for EN, ENO, and MB_HOLD_REG. Use this table as a guide:
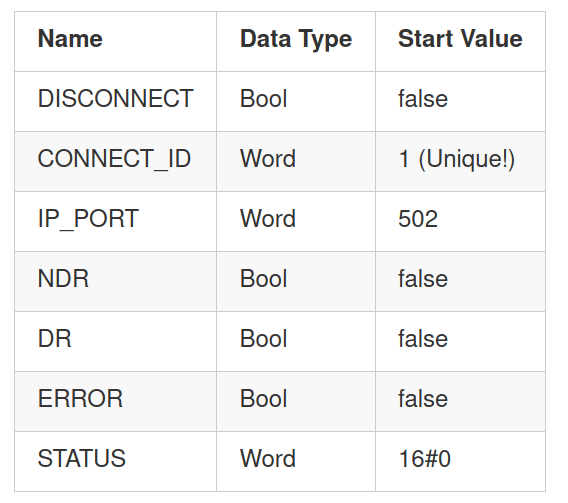
Your data block should closely resemble this:

After creating the config Data block, navigate back to the Main program block. By double clicking each input/output field for the MB_Server, we can open a browser via the button on the right hand side of the text field that pops up. For each field, open your Modbus_Config data block and choose the corresponding field that you created.

Now it’s time to create the Holding Registers.
Holding Register Data Block
Once again in the Project tree under Program blocks, double click Add new block. Choose a Data block, name it something along the lines of Holding_Registers, ensure it is a Global DB, and click OK.

Now we are ready to create our Holding Registers. The starting address is 40001, and there are a number of possibilities when it comes to structuring our data. To illustrate this, I have added four blocks with some default data for viewing later:
- Register_40001 – This block uses each bit of the register [0..15] to represent 16 booleans
- Register_40002 – This block uses a single register to represent an integer
- Register_40003 – This block spans two registers, 40003 – 40004 to represent a real value
- Register_40005 – This block uses a single register to represent a word

After creating our data block we want to disabled optimized block access. In the Project tree, right click the Holding_Registers data block and click Properties at the bottom of the menu. Then navigate to Attributes and make sure that Optimized block access is not checked. Turning off Optimized block access will result in a pop-up window, click OK. Lastly click OK to finalize.
Note: If you wish to change your Holding Register data block, you may need to re-enable Optimized block access, make your changes, and then disable it.

Lastly, we want to include our Holding Registers in our Modbus Server. Navigate back to the Main program block window, click the MB_HOLD_REG field and select your Holding_Registers data block. If there are any errors that result from this action, ensure that the text field is simply your Holding Register data block name surrounded in quotes, e.g. “Holding_Registers”.

Compile
Now that we have finished with our configuration, we want to compile the project. In the Project tree, right click your PLC, select compile, and click Software and Hardware (only changes).
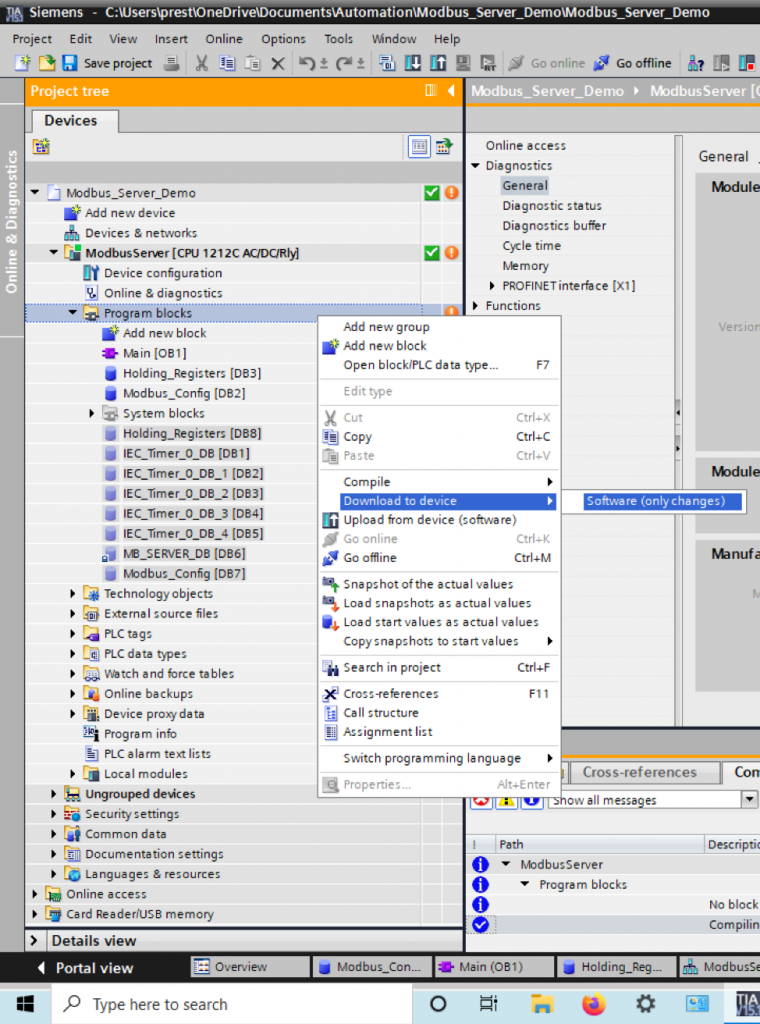
It should compile with no errors, if any occur use the Go to button to navigate to the problem area and refer to that section of the guide to fix the issue. Once it compiles with no errors, we are ready to download to the device!
Downloading to Device
In the top toolbar of TIA Portal, click Go Online and then click Start search. If you cannot detect your PLC, ensure you’re connected to it via ethernet and your computer’s network is configured correctly. Generally the following settings work for a PLC in the default configuration:
- IP Address: 192.168.0.xxx
- PLC IP default: 192.168.0.1
- Subnet Mask: 255.255.255.0
Once you have found your PLC, select it and click Go Online.

In the Project tree, right click Program blocks and then choose Download to device > Software (only changes).
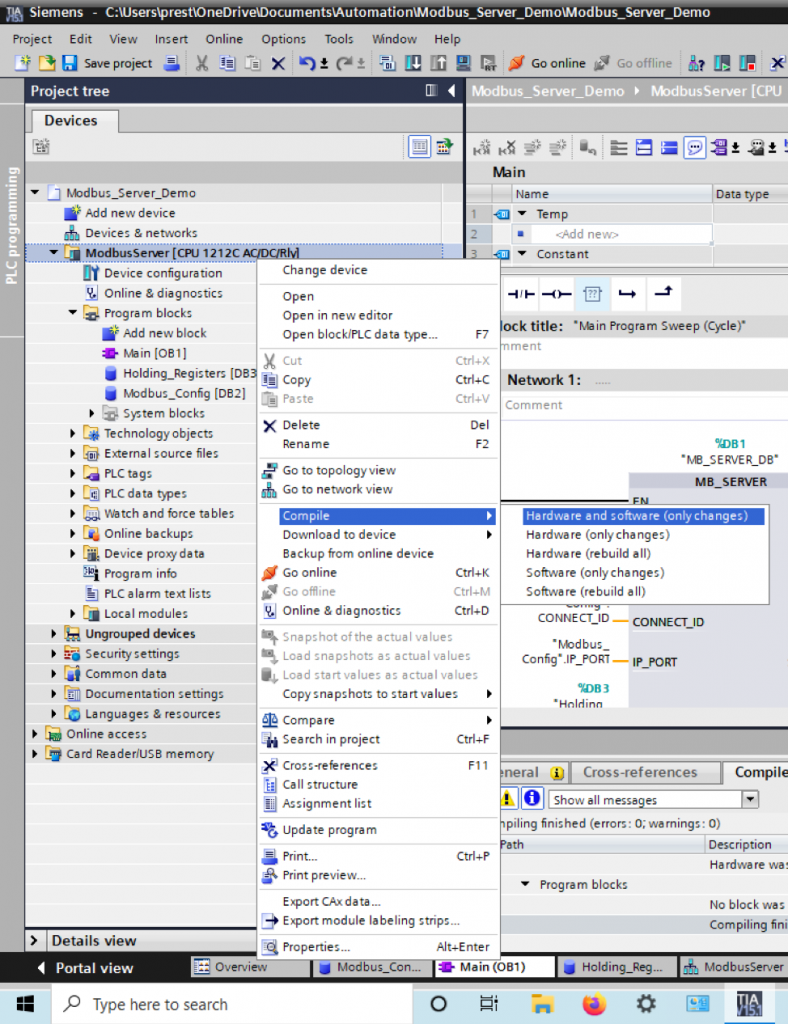
The Load preview page should open with some required actions. In the Stop modules dropdown select Stop all and then click Load. After it has finished loading, click Finish. The device should now be acting as a Modbus Server that can be read/written.
Viewing the Data
OnPing
Add a Modbus Flexible Location
In order to view your Siemens PLC data in OnPing, your device must be connected to an active Lumberjack. Remember this Lumberjack’s IP!
Navigate to OnPing and click Shortcut Links to Add Location (or something similar in your dashboard) and choose Add a modbus flexible.

This should redirect you to a new page. At the bottom of the page, click the + ModbusFlexible button to open the location add form. You will need to enter the following information, leaving the rest as the default:
- Name – Create a descriptive and unique name for location
- Lumberjack URL – The IP of the Lumberjack connected to your PLC
- PLC Url – The IP of your Siemens S7 PLC
- Unit Slave Id: The unique Connect ID for your Siemens S7 PLC
- This was configured in your Modbus Config Data Block (default: 1)
- Controller Type – Choose SiemensS7 Controller
- Company – Choose your company
- Site – Choose the corresponding site for this Lumberjack/Device
- Group – Choose your group
Once you have verified that all the information is correct, click the green Add button below the form.

Adding Parameters
Navigate to the Modbus Flexible widget on the left hand side of OnPing and select your new Company :> Site :> Location.
Word Parameters
At the bottom of the page, click Add New Parameter Type. Select SiemensS7 Holding Register Word16 and click Add. Click + Row twice to create a total of three parameters. We want to add a description for our three single register parameters and update their starting registers to 1, 2, and 5 respectively. Finally, click the green Update button.

Float Parameter
Similarly to the last step, click Add New Parameter Type and select SiemensS7 Holding Register Float and click Add. Add a description for our real valued parameter and update the starting register to 3 and click Update.

Viewing Parameters
After adding the parameters and waiting a moment for the Lumberjack to pull our values from the S7 PLC, we can refresh the location in the browser to see them update.
For Parameter Type: SiemensS7 Holding Register Word16 we should see the following:

For Parameter Type: SiemensS7 Holding Register Float we should see the following:

We can also navigate to Well Selector on the left hand side of OnPing and once again choose your Company :> Site :> Location to view all of our values regardless of type all at once:

And that’s all we need to view our data in OnPing! If you do not have access to a Lumberjack or want to view the data in your PLC directly from your laptop, the next section will outline how to use Modscan64 to achieve this.
Modscan64
Setup
You can easily install a free trial version of Modscan64 for your Windows distribution at the WinTECH Software Website
After starting up Modscan64, simply press OK until the application opens to enter in demo mode. Once the application starts, we want to connect to our device by clicking Connection > Connect in the toolbar at the top. This will open the Connection Details screen. Choose Connect Using Remote modbusTCP Server, input the IP and port of your device, and click OK.

Input Status
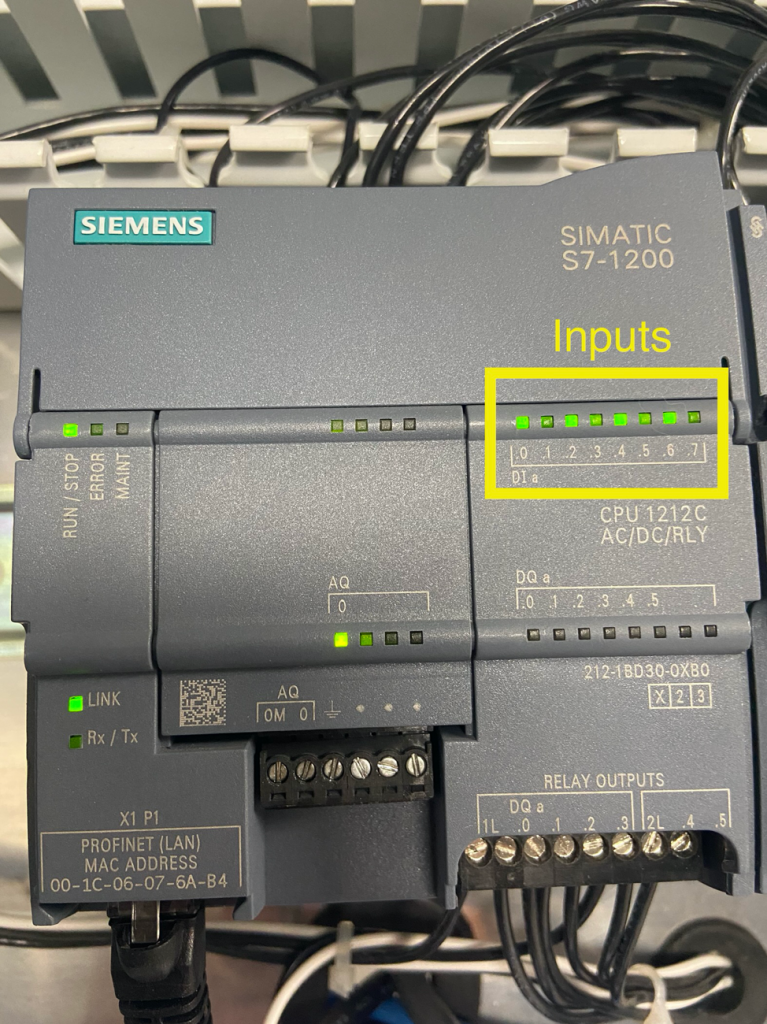
Now that we are connected, we can read the registers of our device. Select the Modbus Point Type 02: INPUT STATUS starting from Address 0001 with a length of eight registers. This will show the status of our device’s inputs.

As you can see, this corresponds to the device input status lights.
Holding Registers
We can view our custom Holding Registers by changing the Modbus Point Type to 03: HOLDING REGISTER and changing the length to five (recall that the Real field spans two registers, 40003 and 40004). Here we can see the default values used in our Holding_Registers data block.

In order to make our Real field human readable, we can go to the toolbar and select Setup > Display Options > Floating Point > Most Significant Register First. This changes the data display format and we can see our default value of 55.5 as expected.

Conclusion
Setting up a Siemens PLC as a Modbus Server is a straightforward process that provides a standard interface for reading and writing device data. It also allows us to structure our Holding Registers however we want, just remember to give each field a descriptive name, document its structure thoroughly, and keep it fairly consistent between devices for universal ease of use.
Thanks for reading and enjoy your data!

