
Welcome to this in-depth tutorial, designed to provide a thorough understanding of configuring OnPing’s Lumberjack Remote application. As industries embrace the era of interconnected devices and automation, the need for efficient data sharing across sites becomes increasingly crucial. The Lumberjack Remote, offered by OnPing, stands as a beacon in addressing these challenges by facilitating seamless communication between different Lumberjack devices.
The Lumberjack Remote application serves as a pivotal component within the OnPing ecosystem, empowering users to transcend traditional communication limitations. In scenarios where conventional methods, like radio networks, are hindered by topological constraints, Lumberjack Remote steps in, utilizing standard cellular networks for the transmission of vital data. This application has proven to be an indispensable addition to the toolkit of automation professionals, providing a robust solution for sharing real-time information across diverse sites.
To contextualize the application of Lumberjack Remote, let’s consider a scenario involving a water tower and a water treatment plant as drawn up in the diagram below:
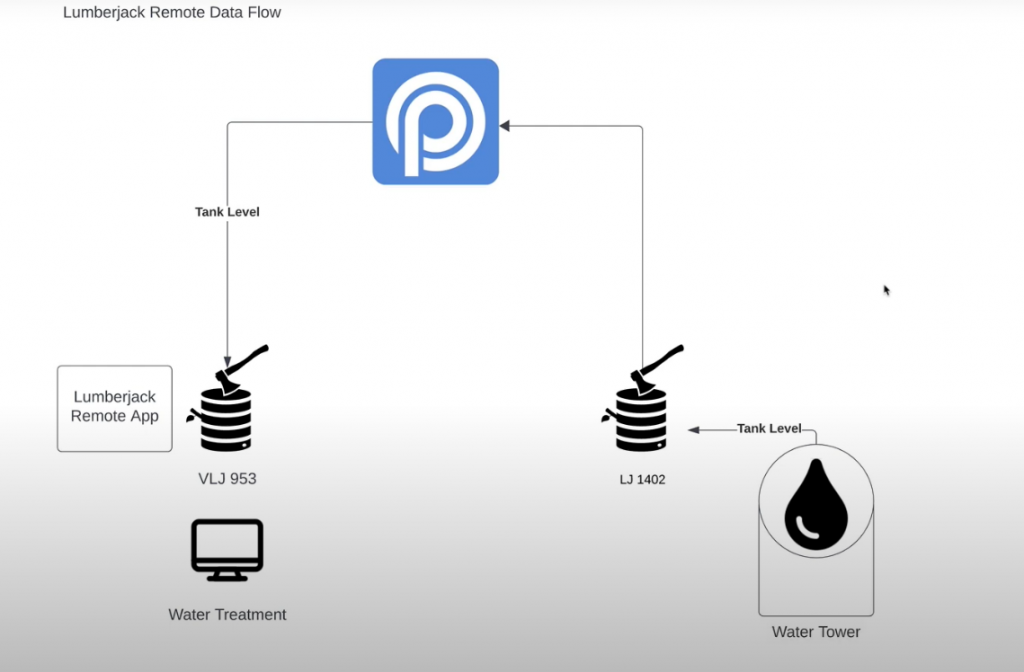
Typically, these entities rely on radio networks for communication. However, when topological challenges render this approach impractical, the Lumberjack Remote becomes the linchpin of connectivity. In this narrative, the water tower’s crucial tank level data is seamlessly transmitted to the water treatment plant, ensuring optimal operations despite challenging terrain.
By making use of the capabilities of OnPing, you can effectively utilize standard cellular networks to transmit data from the water tower to the water treatment system, all facilitated by the Lumberjack Remote App. This functionality serves as a valuable enhancement to your automation toolkit, providing a seamless solution for data sharing across different components.
A key point to remember is that the Lumberjack Remote app is installed on the device that receives the data, not the one sending it. From the perspective of the device sending the data, the situation remains identical to a regular OnPing setup. However, from the viewpoint of the device receiving the data, the information is retrieved from OnPing and then seamlessly integrated into the Lumberjack system. This approach ensures a streamlined process, maintaining consistency for the data sender while efficiently managing data reception on the recipient device. Now, let’s delve into the mechanics of this process to better understand its practical applications.
Access your OnPing account by entering your credentials on the login page. If you don’t have an account, sign up to explore the functionalities of our SCADA system on OnPing.
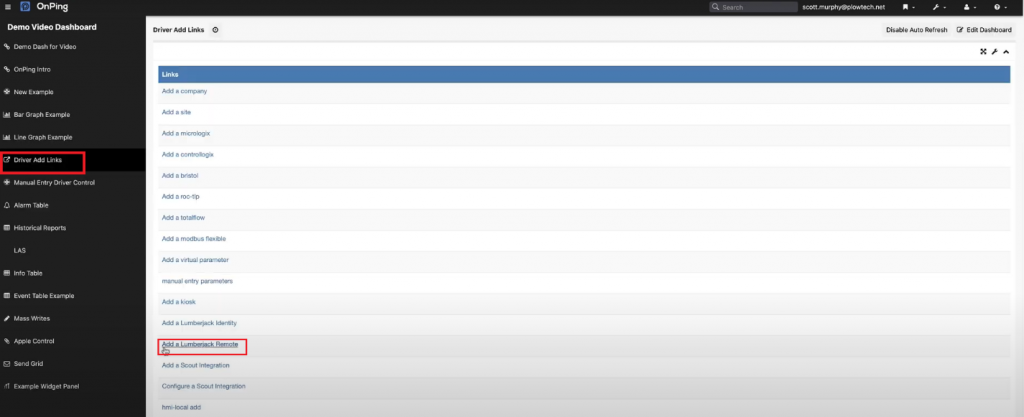
Step 1: Installing Lumberjack Remote Application #
Let’s begin by locating the Lumberjack Remote app within the OnPing interface. Navigate to the “Driver Add Links” section and select “Add a Lumberjack Remote”.
The Lumberjack Remote Locations page will show up. Create a new location by clicking on “New Location” and assigning a meaningful name to your Lumberjack Remote Location. For clarity, it’s beneficial to name it based on the data source, such as “From Water Tower” in this example as we would get our data from the remote water tower.
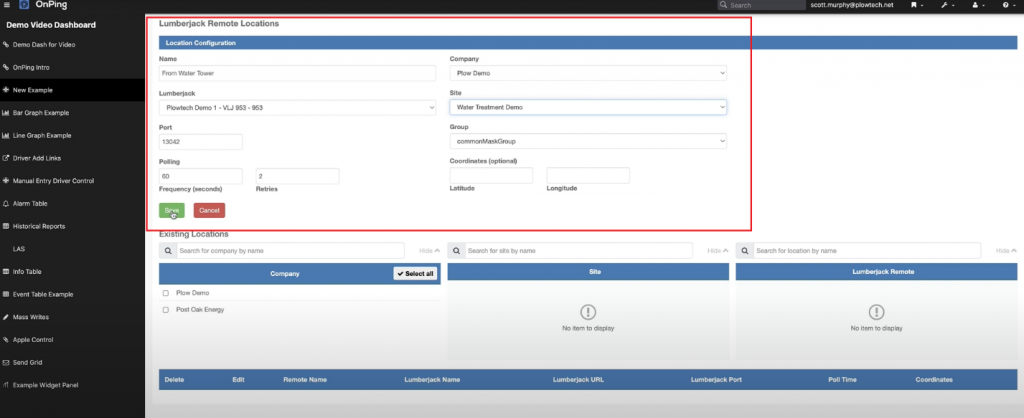
Next, choose the specific Lumberjack device where you intend to install the Lumberjack Remote. In our case, referring to the diagram, we’ve selected VLJ 953, which is already pre-selected. Next, enter the necessary specs: port, frequency (minute), retries and site. We want to maintain the port configuration and set the polling frequency to every 60 seconds with two retries. Place it in the designated location, for instance, our “Water Treatment Demo,” and save the configuration. This step ensures a systematic setup for efficient data retrieval and integration into the Lumberjack system.
Step 2: Adding Parameters to Lumberjack Remote #
Now, with the initial setup complete, it’s time to configure parameters for your Lumberjack Remote. Navigate to the Lumberjack Remote page in your widget list. If it’s not readily available, we’ll add it swiftly for you. Follow these steps:
- Click on “Edit Dashboard” to access the dashboard configuration.
-
Add a new panel by clicking “Add Panel”, and let’s name it “Lumberjack Remote Configuration.” I prefer using a cogs icon for these panels, but feel free to choose an icon that best suits your setup. After you finish your setup, click “Save Changes”.

-
Click on the + Widget icon and select “Lumberjack Remote” to add it to your newly created panel.
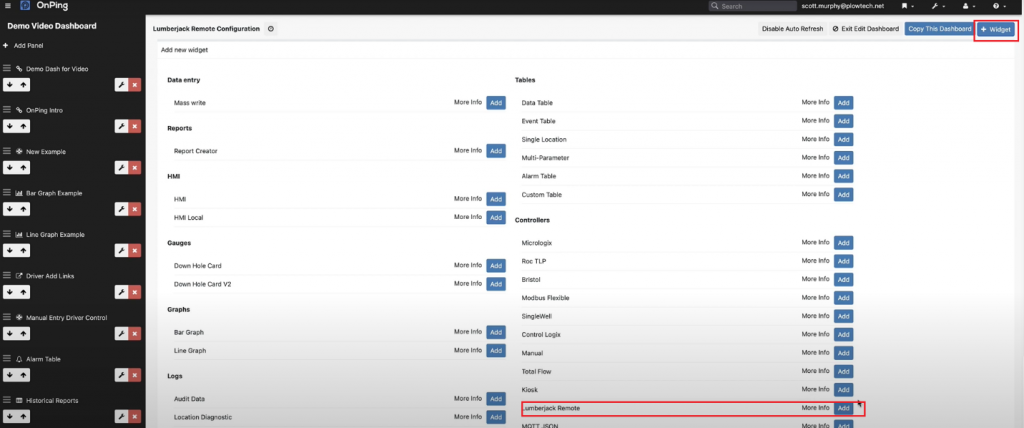
Now, you have a dedicated Lumberjack Remote Driver panel. This is where you’ll manage and configure your Lumberjack Remote parameters. Save your changes and exit the Edit Dashboard mode. Upon refreshing, you’ll find the Lumberjack Remote Driver panel still accessible, ensuring a seamless transition into parameter configuration for our Lumberjack Remote App.
Now, let’s proceed to locate the Lumberjack Remote App we initiated earlier, specifically the one associated with “From Water Tower” in our Water Treatment Demo. Here, we’ll establish the groundwork for adding remote parameters that will be stored on our Lumberjack. To begin, click on “Edit Parameters”.

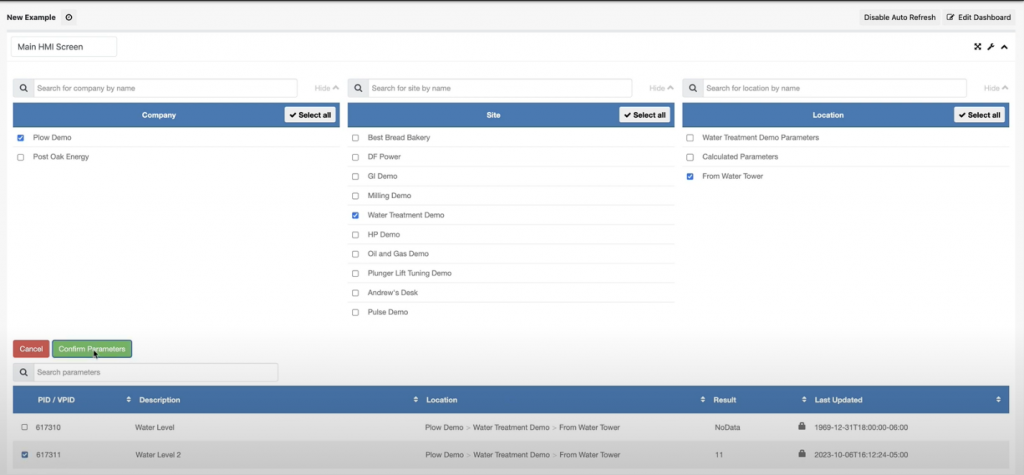
From the available remote parameters, let’s choose one from our fictional company, Post Oak Energy, for the purpose of this tutorial. In this case, we’ll select the “Water Level” remote parameter. Tick the box on the left to choose it, and then click “Add Parameters.”
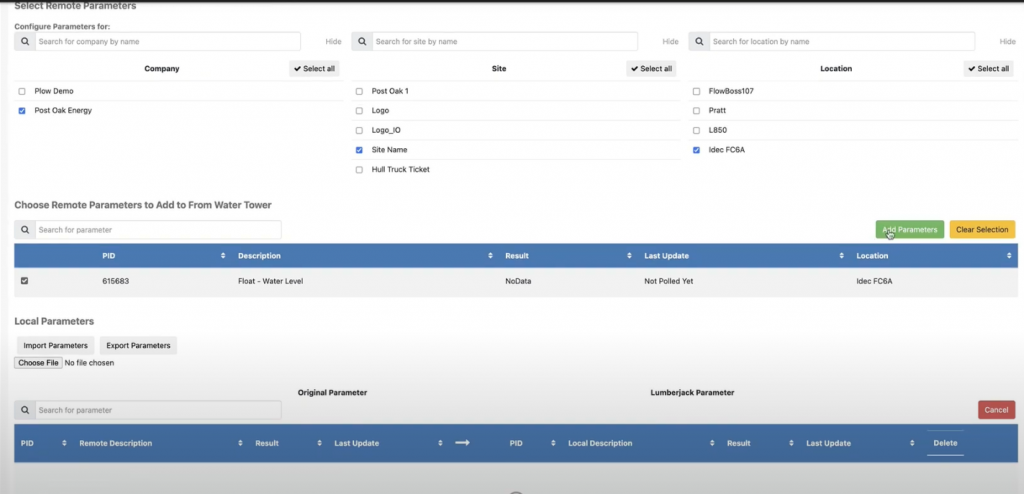
Upon clicking “Add Parameters,” you’ll observe the selected PID for the Original Parameter as well as our newly created Lumberjack Parameter, along with details such as site, location, result, and destination. Modify the description to simplify it, perhaps just labeling it as “Water Level.” Save your new parameters by clicking “Save New Parameters.”
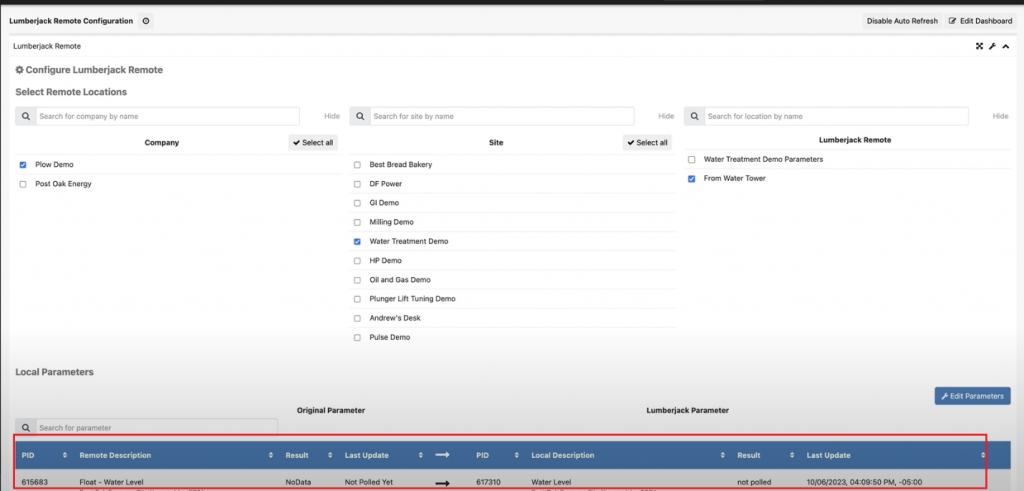
After refreshing the page, you’ll notice that it now displays the data for the Water Level. It’s crucial to note that the initially chosen parameters lack data, resulting in the absence of data in the output parameter. These elements are meticulously kept in sync, with updates closely tied to the Last Update time relative to the polling frequency.
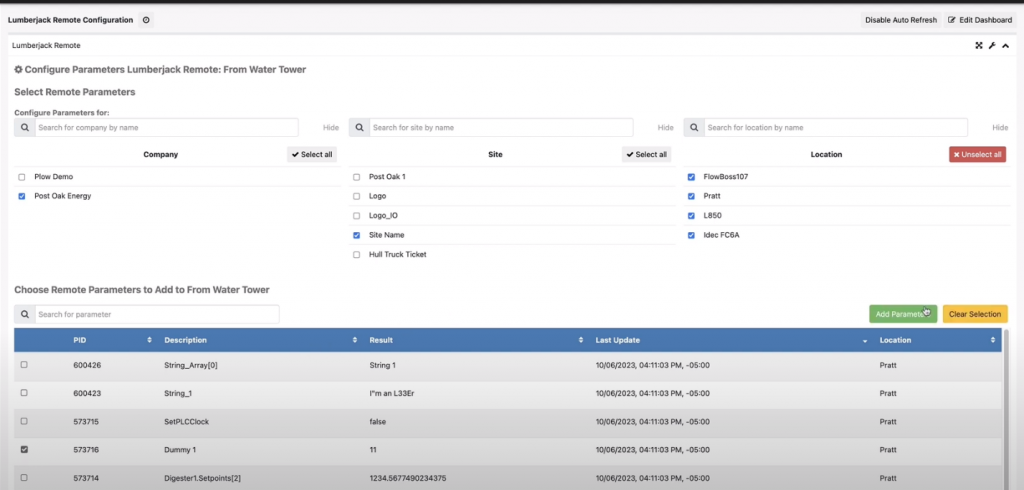
For demonstration purposes, let’s select a different parameter with actual data—let’s call it the “Dummy” parameter. Apply the same steps as before, clicking “Save New Parameters” and updating the description to “Water Level 2.”
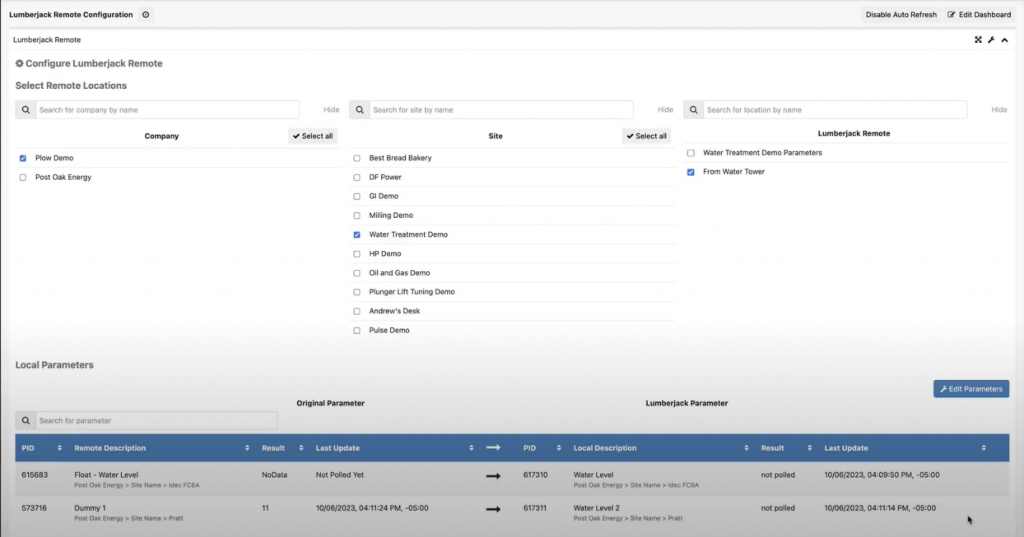
After a brief moment, you’ll observe the update. The Last Update times for both the Dummy and Water Level 2 parameters are remarkably close, highlighting the synchronization aspect. It’s noteworthy that the Water Level parameter didn’t poll because the Remote Water Level didn’t poll. This temporal alignment is incredibly useful, allowing you to set up effective communication loss strategies, heartbeats, handshakes, or any necessary measures to ensure precise synchronization while accounting for communication losses.
Step 3: Integrating Shared Data on OnPing #
As parameters are successfully added, the Lumberjack Remote PID becomes a versatile asset within the OnPing ecosystem. It can be seamlessly integrated into OnPing, functioning like any regular parameter.
As an illustration, let’s navigate back to our HMI. Click on the wrench icon situated in the top right corner to transition into Edit mode. Select “Indicator” to incorporate a status indicator and assign the recently created parameter to this indicator. You’ve now successfully integrated a dynamic indicator into your HMI, showcasing real-time data from a remote location.

This streamlined process enables you to effortlessly incorporate remote data into your HMI, offering a user-friendly interface for monitoring and enhancing the visibility of critical information across your OnPing system.
In summary, the process outlined in this tutorial demonstrates how effortlessly you can establish remote data sharing between two different sites. The steps are straightforward and simple, making it an accessible task within the OnPing environment. We trust that this tutorial has provided valuable insights, enhancing your understanding of OnPing functionalities.
We hope you find this tutorial beneficial on your OnPing journey. If you have any questions or require additional assistance, please don’t hesitate to reach out to us at info.plowtech.net. Our dedicated team is here to ensure you receive the support needed for a seamless exploration of OnPing’s capabilities. Happy exploring!


