This guide will explain step by step, how to add a Manual Parameter in OnPing. Manual Parameters are used for a number of functions in OnPing, for example creating events for event tables, to set up dispatch callouts, and setting thresholds for alarms. Manual parameters are located locally on Lumberjacks. The parameters are not being ‘pulled’ from an external source.
Step 1: Select Lumberjack and Location #
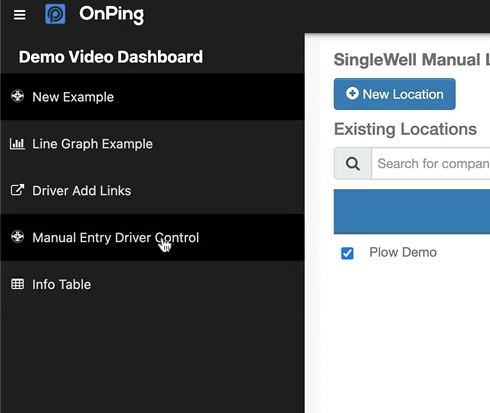
First, select the desired Lumberjack for the new parameter. Next, navigate to the ‘Driver Add Links’ panel on the Dashboard. In this example the dashboard is labeled ‘Demo Video Dashboard’.
In the event that the ‘Driver Add Links’ panel is not available in the dashboard, please contact the system admin or OnPing support for additional information.
Once inside the ‘Driver Add Links’ panel, scroll to and click the ‘manual entry parameters’ link. If ‘manual entry parameters’ is not available, it may also be called ‘single well parameter’.

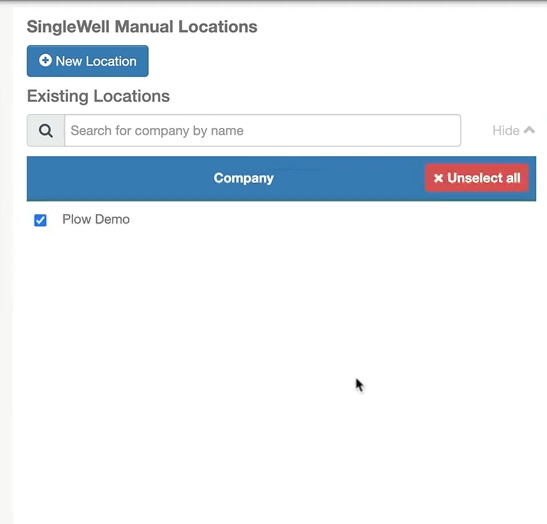
This will add a new parameter and a new panel named ‘New Example’. Select the company for this new parameter. In this example, the company name is ‘Plow Demo’.
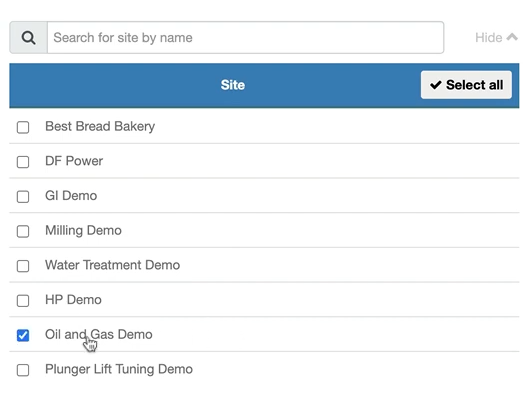
Select the Site for the new parameter. In this example, the site is named ‘Oil and Gas Demo’.
Next, select the Location for the site ‘Oil and Gas Demo’. In this example, there are no locations available.
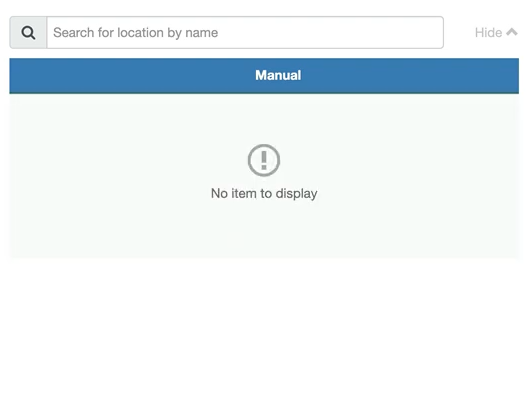
Add a new location by navigating to the blue ‘+ New Location’ button at the top left of the panel screen.

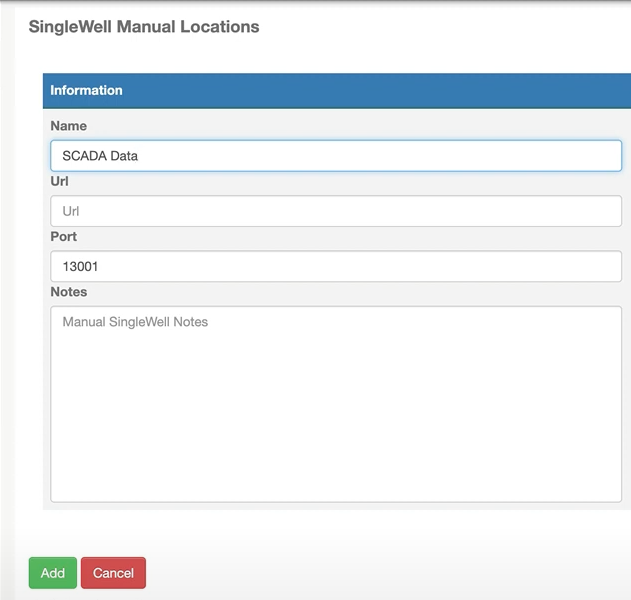
By convention, this type of data is called “SCADA Data” because these parameters are only available in the SCADA system (Supervisory control and data acquisition). These parameters are found locally and do not exist on an external device.
Name the new location. In this example the name of the new location is named ‘SCADA Data’.
Next, type in the Lumberjack ID into the URL text bar. This number can be found on the physical Lumberjack unit. In this example, the URL or Lumberjack ID is ‘10.7.9.153’.
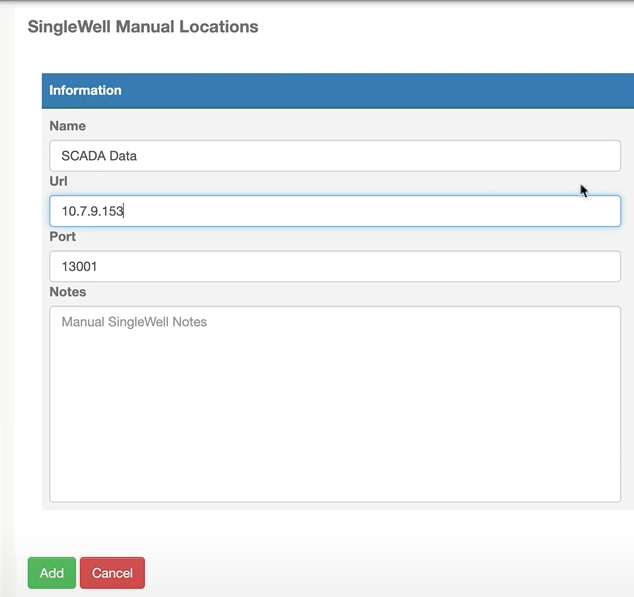
Following the URL entry, select the company assigned to this new location in the table ‘Location’ (to the right of the ‘Information’ table). In this example, the company selected is ‘Plow Demo’.

Select the Site for the new location. In this example the site ‘Oil and Gas Demo’ is selected.

Select the Group for permissions to be available to this new location. In this example the group ‘plowDemoUsers’ is selected. Note: the group with the lowest ranking permissions should be selected. All groups above that group will also have permissions to the new location information.

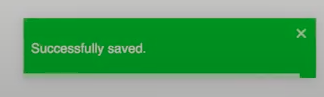
Now that all the information is imported and selected, click the green ‘Add’ button at the bottom left of the New Location window.

An OnPing notification will appear at the bottom right of the screen to confirm that the new location has been saved successfully.
Now there is a location available to add the new parameters to.
Step 2: Add Parameter #
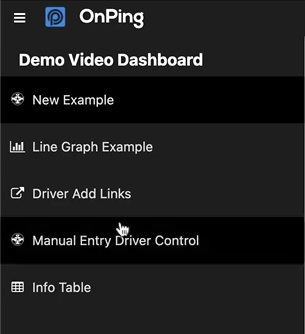
Navigate to the ‘Demo Video Dashboard’ dashboard and select the ‘Manual Entry Driver Control’ panel.
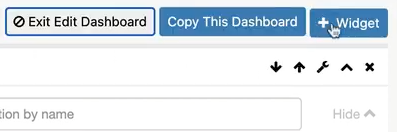
Add the new parameter to the dashboard by clicking the gray ‘Edit Dashboard’ button at the top right of the panel window.

Next click the blue ‘+ Widget’ button.
A dropdown window will appear displaying the available widgets to add to the dashboard. Scroll to the ‘Controllers’ list and click the blue ‘Add’ button to the right of ‘Manual’.

Once the new ‘Manual’ widget has been added, exit edit dashboard mode by clicking the gray ‘Exit Edit Dashboard’ at the top right of the panel window.

Again, select the company, site and location. In this example, the location is the new location created in Step 1 named ‘SCADA Data’.

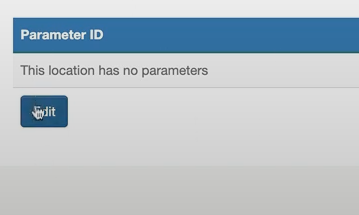
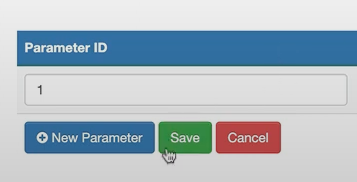
A dropdown window will appear displaying the Parameter ID information. In this example, there are no parameters created. To create a parameter, click the blue ‘Edit’ button in the ‘Parameter ID’ window.
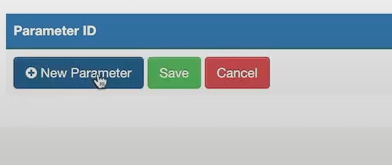
Next, click the blue ‘+ New Parameter’ button.
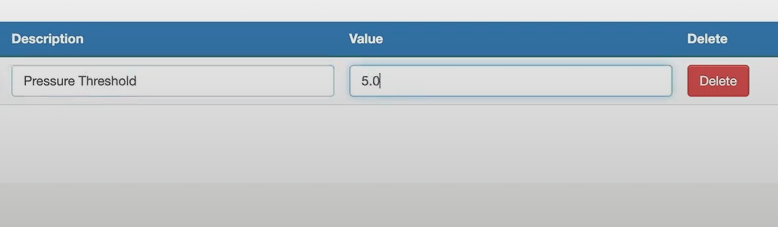
As stated in the summary, these parameters can be used for a number of different functions. Enter the name of the new parameter by typing into the ‘Description’ text bar next to the ‘Parameter ID’. In this example, a threshold parameter will be created named ‘Pressure Threshold’.

Next, insert the value for the new parameter. In this example, the value is ‘5.0’.
Click the green ‘Save’ button to save the new parameter.
Step 3: Configure Parameter #
Now that the new parameter(s) are saved, navigate to the ‘Info Table’ panel on the dashboard.

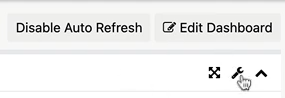
On the ‘Info Table’ panel, click the wrench iconfrom the toolbar at the top right of the window.
A toolbar will dropdown displaying customizing options. Click the blue ‘Edit Table Contents’ button on the toolbar at the top left of the window.

Once in Edit Table Mode, click the blue ‘PID’ button under the ‘Setpoint’ table.

Next, click the pencil icon to the left of the ‘PID’ button to open additional customization options. Again, click the blue ‘PID’ button but this time, under the ‘Value’ table.

Select the Company, Site, and Location from Step 1. In this example, the company is ‘Plow Demo’, the site is ‘Oil and Gas Demo’ and the location is ‘SCADA Data’

A dropdown window will appear displaying all available parameters. Select the parameter created in Step 2.
Click the blue ‘Update’ button at the top left of the ‘Info Table’ window.

Once the info table has been updated, save the table by clicking the green ‘Save Custom Table’ button at the top left of the window.

The parameter is now configured in the table.
Step 4: Implement Parameter in Event Table #
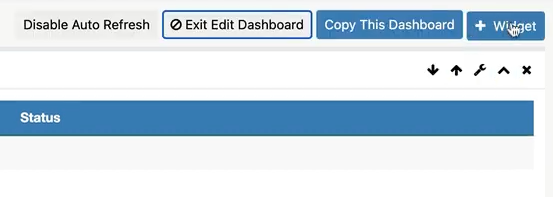
Now that the parameter is configured, assign the parameter. In this example, the new parameter will be used to trigger an event. An ‘Event’ in OnPing is the equivalent to a value being saved to the OnPing historian. Navigate to the top right of the dashboard window and click the gray ‘Edit Dashboard’ button.

Next, click the blue ‘+ Widget’ button to add an Event Table widget.
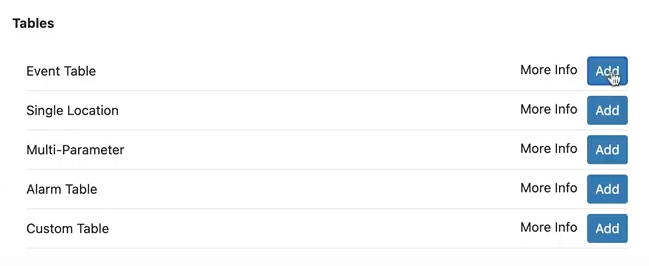
Under the ‘Tables’ list, click the blue ‘Add’ button to the right of ‘Event Table’ to add it to the dashboard.
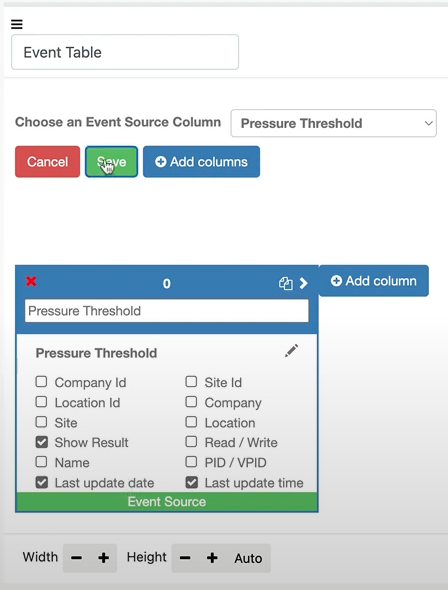
To add an event to the new event table, click the pencil icon as shown below:
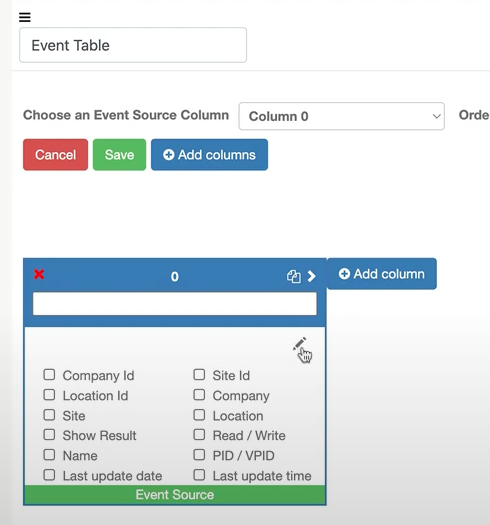
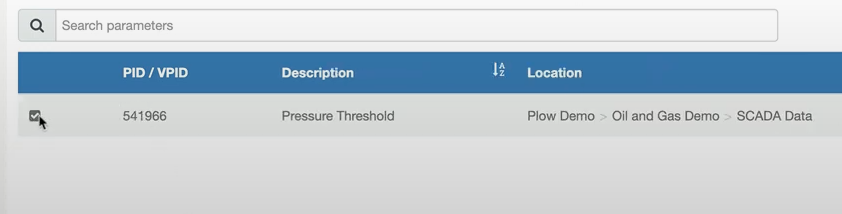
Again, select the Company, Site and Location. In this example, the company is named ‘Plow Demo’, the Site is named ‘Oil and Gas Demo’ and the Location is named ‘SCADA Data’.
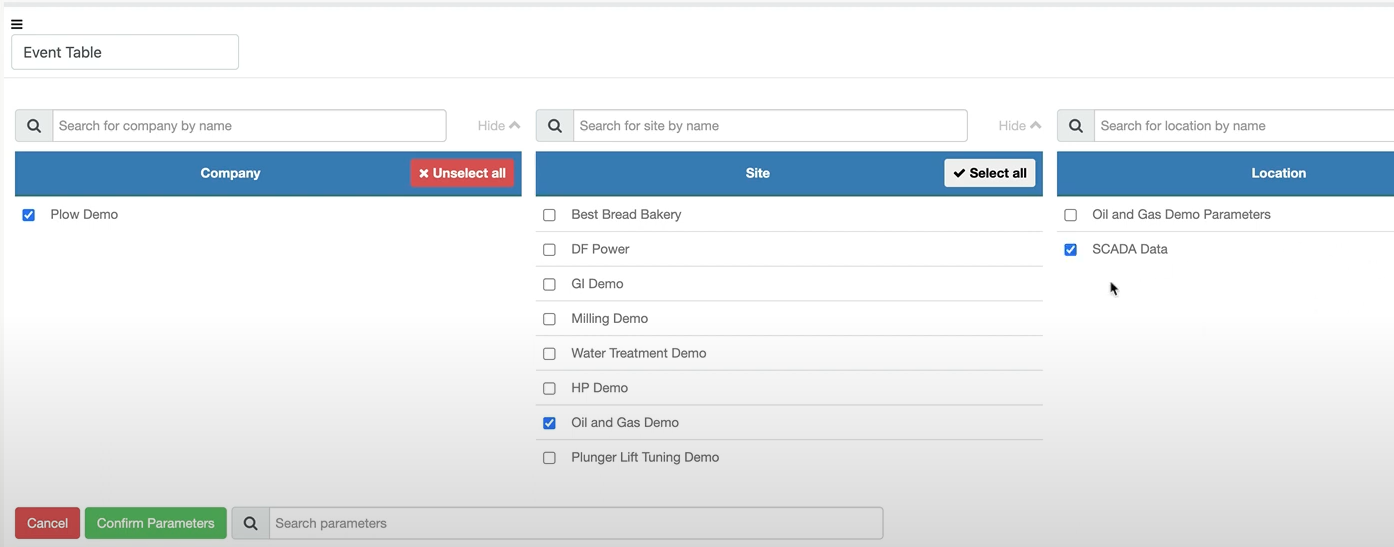
Click the checkbox to the left of the parameter desired. In this example, the new parameter ‘Pressure Threshold’ created in Step 2 is selected. Click the green ‘Confirm Parameters’ button at the top left of the parameters window.

Once the parameters are confirmed, decide how many events will be displayed by entering the number in the ‘Display Last’ text bar to the right of the Info Table’ window.

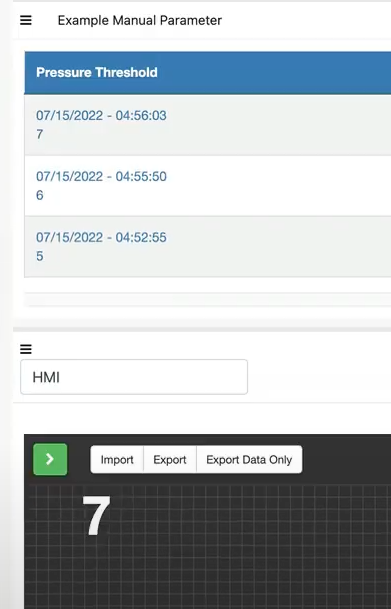
In this example, 10 events will be displayed.

Next, select the information desired for display by clicking the checkbox next to the option. In this example, ‘Show Result’, ‘Last Update Date’ and ‘Last Update Time’ are selected for display. Once all the desired information is selected, click the green ‘Save’ button just above the information options table.
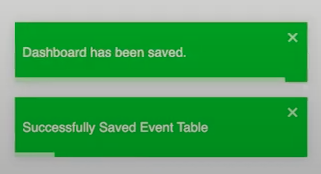
An OnPing notification will appear displaying that the ‘Event Table has been saved successfully’.

While remaining in ‘Edit Dashboard’ mode, name the event table. In this example the event table is named ‘Example Manual Parameter’.

Once the event table has been named, click the blue ‘Save’ button from the toolbar at the top right of the Dashboard window.

Another OnPing notification will appear stating that the ‘Dashboard has saved successfully’
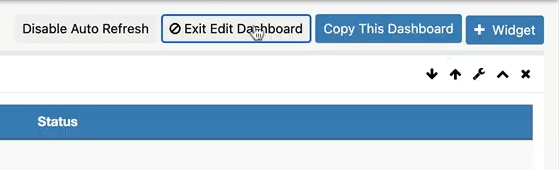
Now click the gray ‘Exit Edit Dashboard’ button from the toolbar at the top right of the Dashboard window.
This completes the creation, configuration and assignment of parameters in OnPing.
Step 5: Update Parameter Value in HMI (Optional) #
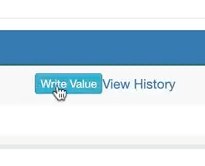
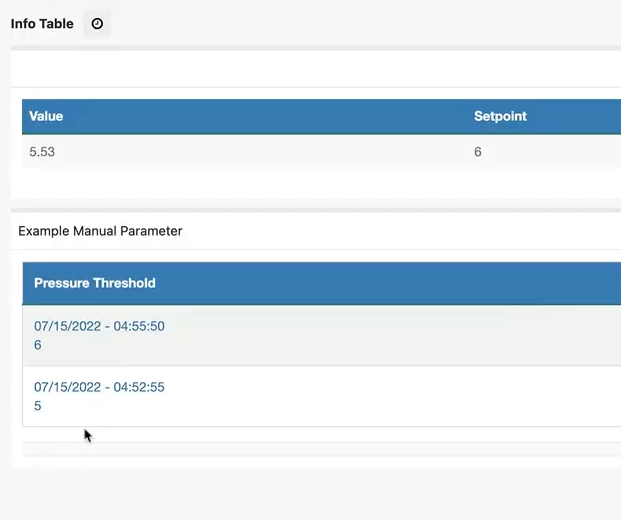
To further test that the parameter is updating accordingly, manually change the value and refresh. In this example, the setpoint ‘5’ will be changed to ‘6’. To change the setpoint, click the text ‘5’.

Click the blue ‘Write Value’ button that appears.
Manually change the value from ‘5’ to ‘6.0’ and click the green ‘Write’ bottom just under the value text bar.

Refresh the browser window and notice that the new setpoint has been updated to ‘6’.
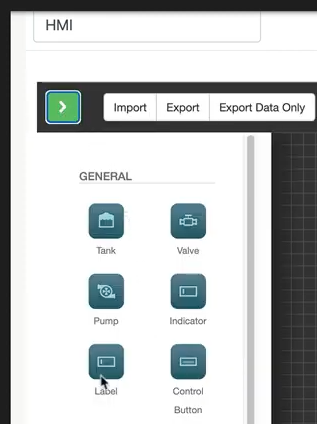
This table does not execute instant feedback. For quicker updates and feedback, add an HMI widget to the panel. Once in the HMI (Human Machine Interface) widget, click the green arrow at the top left of the HMI window to add a label.
Under ‘General’, click the blue ‘Label’ icon to add a label to the HMI.
On the right side of the HMI window, additional options for customizing the new label will appear. Select the parameter created in Step 2 by clicking the ‘Use value from parameter’ button to the right of the label text box.

Navigate to the desired parameter by selecting the Company, Site and Location. This will open the parameters available to be assigned to the new label. Click the checkbox to the left of the desired parameter to select. Then click the green ‘Confirm Parameter’ button at the top of the parameters window.

Now that the parameter has been assigned to the label, save the new label.

The label will now display the new parameter value in the HMI and will be updated as soon as the value changes. This eliminates the need to refresh the browser window as the value is being displayed in real-time.